Composition

Composition is the joining of different parts or elements to make a whole. In photography especially using digital slr that thought is very important in taking quality pictures. This guidelines are just to be thought about though, it is not necessary to try to use them with every picture you take or there wouldn't be any creativity in your work. Once you learn these rules and strategies you will be more prepared to find great picture spots and opportunities. And the most important thing is try to get creative as much as you can after you learn from this guidelines.

Firstly, before you just decide take a picture you should or must consider and think what you want your viewers to look at and how you should display main points of interest. You should know, what is the main subject? What is the best angle should the light be hitting in my picture? Is there anything that could accentuate the main subject? Where should the main subject be in the frame? These are all important things you should consider, but that doesn't necessarily mean you need to follow the rules exactly.

Does everybody know about The Rule of Third? The Rule of Thirds has been used for a long time and is probably the most important thing to consider of all the composition techniques. This rules means that the frame can be divided into three horizontal sections and three vertical sections. Where horizontal and vertical lines intersect, it makes an ideal location for the more important parts of your photo. By positioning your main subject at one of the four intersections you give the subject more accent. Most well-known pictures or paintings in the world nowadays applied the rule of thirds to them.

Straightforwardness is the method of keeping the information in a picture moderately simple. If the main subject is close, then the background should be very simple to keep away from interruption. Try to keep everything not important much less interesting than what's important in the frame that you want to show. The important things is try to avoid lines or objects that lead the eye away from the subject.

Framing is the method of using ordinary environment to add more meaning to your subject. It could be anything such as buildings, trees, a window, or even a doorway. In the process of doing this you need to be careful that you don't only focus on what's framing your subject. Ensure you focus on the main subject, and also it is a good plan to use a narrow aperture to get a high depth-of-field. It also ok if the part of the picture framing the subject was more dark but make sure you take your light reading on the main subject.

Quality can add a momentous amount of interest in any photo. When people see quality in photos they start to imagine what it feels like to touch what's in the photo. In order to make a picture expose a quality you must make sure the light is coming almost exactly from the side of the surface so it creates shadows in places key places.

Leading Lines are used to attract the eye deeper into a photo or to an important subject. Straight, curved, parallel, or diagonal lines are all good at promoting interest.

Colors are what add heart and feeling to your photo. Certain color patterns can encourage awe and surprise in viewer. Even colors can be used to add all sorts of inflections and effects, you must be careful to not draw attention away from the main subject.


And the most important thing is always practice to be a good photographer. Good luck

Basic for Exposure

Exposure is the quantity of brightness pull together by the sensor in your camera throughout a single photo. If the shot is depiction too long the picture may washed out. If the shot is depiction too short the picture will come out too dark. Roughly all cameras today have light meters which quantify the light in the given shot and set an ideal exposure mechanically. The majority people depend on the light meter which is fine, but if you know how to manage your exposures you can get some artistic and maybe better quality of pictures.

The primary controls of your camera uses for exposure are shutter speed and aperture. Shutter speed control the amount of time the sensor is exposed to light. The aperture control the size of the lens opening that lets light into the camera. Shutter speeds are quantify in seconds and more frequently division of a second. Apertures are quantify in term of f/stops.

You might question why there is not just a steady shutter speed or a steady aperture so that you would only have to think about one control. The motive is that even if they both manage the quantity of light getting to the sensor they also manage other things of the image.

Majority digital SLR's cameras nowadays you can even adjust the compassion of the sensor when pull together light which is called the ISO speed. The higher the ISO speed the quicker the camera collects light but it also give more noise to the picture than the lower speeds.

The best way to learn how to use shutter speed and aperture is to just keep experimenting with them. Just keep trying and practice until you get the quality of pictures that you want.

Portfolio

hye to all....

Just to inform all of you one thing,my portfolio website will be launch soon...

with love,
dslr admin

Tips To Improve Landscape Image


Landscape photography can be a challenge, but with the appropriate agreement and acceptable accustomed ablaze it can be fabricated a bit easier.

All the world’s cameras, films and added accurate accessories are no added than accoutrement for authoritative mural pictures. Cameras don’t anticipate for themselves. Whether we use agenda or blur camera, the aforementioned accurate attempt apply.

We don’t accept to stick to abounding rules to aftermath abundant mural images, but alive what they are will accomplish your pictures added successful. There are two arresting credibility in mural photography: how to compose your image, and how to use accessible accustomed ablaze in any accustomed situation.

Lets alpha off with light: There are three basal qualities of light: intensity, administration and color.

Intensity: refers to the backbone of light. If the sun is aerial in the sky, ablaze can be acrid and too strong. Cloudy canicule accompany bendable and defused light.

Direction: this refers to ablaze placement. There are three categories of ablaze placement: front, aback and side-lighting. Side lighting produces added arrangement amid ablaze and shade.

Color: the blush of sunlight varies depending aloft altitude and time of day. If the sun shines at the alpha or the end of the day, the blush of the ablaze will be abundant warmer, and will advance to a abundant added affecting scene.

Understanding accustomed ablaze will advance your adeptness to see. You will alpha to see the adorableness of ablaze in a altered and agitative way.

In mural photography it is actual important to booty affliction with composition. A accustomed arena can be adapted by advantageous abutting absorption to detail. Agreement is all about how you align the elements in advanced of you.

Here are a few account in which you may acquisition useful.

Lead with lines: To advance with curve into the capital allotment of the arena will draw your eyewitness into your image. These curve don’t accept to be straight. Lines, such as tracks, riverbanks or fences, may assignment successfully.

Foreground interest: Simple beginning altar can accord your mural a greater faculty of depth. Use a baby breach (f/22) to accumulate the absolute arena in focus.

Nikon D90


PRODUCT : Nikon D90

SPECS :

Type of Camera : Single-lens reflex digital camera

Effective Pixels : 12.3 million

Image Sensor : Nikon DX format (23.6 x 15.8 mm) CMOS sensor

Sensitivity : ISO 200 to 3,200 in steps of 1/3 EV, plus HI-0.3, HI-0.5, HI-0.7, HI-1 (ISO 6400); sensitivity decreases approx. LO-0.3, LO-0.5, LO-0.7 and LO-1 (ISO 100)

File Format : NEF (12 bit compressed RAW); JPEG (Baseline-compliant); AVI (Motion JPEG compression format with monaural sound)

Shooting Modes : 1) Single frame shooting mode, 2) Continous low shooting mode, 3) Continous high shooting mode, 4) Self-timer mode, 5) Delay remote mode, 6) Quick-response remote mode 7) D-Movie

White Balance : Auto (TTL white-balance with 420-pixel RGB sensor), 12 manual modes with fine-tuning; color temperature setting; preset white balance; white balance bracketing

LCD Monitor : 3.0", 920,000-dot low-temperature polysilicon TFT LCD, allows up to 170-degree wide viewing angle

Viewfinder : Fixed eye-level pentaprism; built-in diopter adjustment (-2 to +1 m-1)

Focus Modes : 1) Autofocus (AF): Single-servo AF (AF-S); Continous-servo AF (AF-C); Auto AF-S/AF-C selection (AF-A), 2) Manual focus (M) can be selected from 11 focus area

Exposure Metering System : 1) 3D-Color Matrix Metering II (type G and D lenses); Color Matrix Metering II (other CPU lenses) performed by 420-segment RGB sensor, 2) Center-weighted: Weight of 75% given to 6, 8 or 10mm circle in center of frame, 3) Spot: Meters 3.5-mm circle (about 2.5% of frame) centered on active focus area

Maximum Shutter : 1/4000

Minimum Shutter : 30

Flash Control : 1)TTL flash control with 420-pixel RGB sensor; i-TTL balanced fill-flash and standard i-TTL fill flash available with SB-900, 800, 600 or 400, 2) Auto aperture available with SB-900, 800 and CPU lens 3) Non-TTL auto available with SB-900, 800, 28, 27 or 22s 4) Range-priority manual available with SB-900, 800.

Self-Timer : Electronically controlled timer with duration of 2, 5, 10 or 20 s.

Supported Languages : Total of 17 languages: Chinese (Simplified and Traditional), Danish, Dutch, English, Finnish, French, German, Italian, Japanese, Korean, Norwegian, Polish, Portuguese, Russian, Spanish, Swedish

Power Requirements : Rechargeable Li-ion Battery EN-EL3e, AC Adapter EH-5a (optional)
Battery Life (on a fully charged battery) Approx 1,000 shots

Weight (without battery, memory card or body cap) : Approx. 620g

Supplied Accessories (may differ by country or area) : Rechargeable Li-ion Battery EN-EL3e, Quick Charger MH-18a, USB Cable UC-E4, Video Cable EG-D2, Camera Strap AN-DC1, Body Cap BF-1A, Accessory Shoe Cover BS-1, LCD Monitor Cover BM-10, Software Suite CD-ROM
Other Features Retouch menu, Info Display on LCD monitor, Intergrated Dust Reductions System, Live view (with face-priority AF), D-Movie


PRODUCT REVIEW :

Nikon has been cranking out new agenda SLR camera upgrades like crazy these endure two years, with the low, high, and pro end of the calendar accepting amend afterwards update, but the mid-level SLR in accurate has gone added than 18 months after an upgrade. While the Nikon D80 has a affluent feature-set and maintained a top resale amount throughout its tenure, it's due for an upgrade.

Though it's backward to the party, the Nikon D90 arrives fashionably, just as its antecedent did in backward 2006. It comes aimless in with a lot of of the accepted hot appearance that the D80 lacked, additional a new aberration that will basin them all over with its appliance and utility.

With a 12.3-megapixel sensor, the Nikon D90 rises to the resolution of the added able D300. It aswell shares the aforementioned acuteness as the D300, alignment from ISO 200 to 3,200, additional L1 (100) and H1 (6,400).

Another capital advancement on the Nikon D90 is the move to a top resolution 3-inch LCD screen. The 920,000-pixel affectation has a 170-degree examination bend and appears to be as nice as the new screens begin on the D3 and D300. It makes blockage focus and application Reside appearance approach that abundant added pleasant.

New to the average ambit for Nikon, the Reside Appearance affection offers some new tricks over the approach begin on the Nikon D90's high-end predecessors, decidedly including Face Detection. Surprisingly, there is no phase-detect autofocus accessible on the Nikon D90 if in Reside appearance mode, alone three contrast-detect modes: Face Priority, Wide Area, and Normal Area. Just as we've apparent on customer cameras, in Face Apprehension mode, a box surrounds detected faces and follows them about the screen. The Nikon D90 can clue up to 5 faces. Reside appearance is activated with a committed button just appropriate of the LCD.

Though Face Apprehension is accessible in Reside appearance mode, its account goes further, as it's now an basic allotment of Nikon's Scene Recognition Arrangement (SRS). Thanks to the Nikon D90's 420-pixel cast metering sensor, the SRS can amalgamate blush metering with autofocus sensor abstracts and tune white antithesis and acknowledgment with a accurate bent against accepting faces apparent properly. In theory, this should aswell cover authoritative abiding the Nikon D90 focuses on an eye rather than a adenoids or forehead. If accurate in practice, this is absolutely an advance. Face apprehension even comes into play in i-TTL Flash control.

The Nikon D90's 11-point phase-detect AF arrangement is arrayed in a design arrangement and now includes 3D focus tracking as begin on the D3 and D300.

Since the aurora of Reside appearance on SLRs, the accessible catechism has been, "Why no cine mode? If you can draw a reside angel off the sensor, why can't you almanac it?" Nikon is the aboriginal to acknowledgment the catechism with a resounding, "You can!" The Nikon D90 annal movies as a Motion JPEG in AVI architecture at 24 frames per additional at what they're calling "720p equivalent" resolution: 1,280 x 720. Other resolutions cover 640 x 424, and 320 x 216. Though you accept to focus manually, and breach charcoal anchored during recording, audio for the videos is captured through the monaural mic on the camera.

A new lens will address with the Nikon D90 kit, as well: the Nikkor 18-105mm f/3.5-5.6 ED VR, with one extra-low burning aspect and one amalgam aspheric aspect to advance angel quality.

Digital SLR camera setting tips

Shooting your photos digitally can be fun and simple but to get connected and connected after-effects you will charge to apprentice how to sett up your camera properly. If you just starting out in with agenda slr cameras we advance starting out with a acclimated agenda slr camera, the amount to access is added beneath and you get a bigger options than your acceptable point and shoot agenda camera. Every agenda SLR camera is altered but they all accept camera ambience as a agenda items. We accept created eight accepted tips that should advice you alpha appear to alley of connected and connected after-effects with your photography. So if you wish abundant shots out of your acclimated agenda camera apprentice these seven tips backwards and forwards.

1. Adjust white balance manually to annual for lighting altitude (especially beaming light)

2. Carry a baby gray or white agenda with you to advice you set the white balance.

3. Use a high ISO appraisement to annual for lower ablaze altitude (Be accurate not to go to top because the college the ISO the higher/more the noise/grain)

4. Use Aperture and Shutter Priority modes to accumulate backgrounds in focus (aperture mode) or benumb fast-moving activity shots (shutter priority)

5. Use Full Manual Approach to set both breach and bang modes calm (though this can get complicated, use your histogram to adjudicator the candied spot)

6. Try access approach to abduction a agglomeration of shots, rapid-fire

7. Use histogram displays to bound analysis if you accept overexposed a shot

8. Use acknowledgment bracketing to try the aforementioned attempt at altered acknowledgment levels to acquisition the one that ultimately looks best.

These tips will yield some time to master. Be patient, persistent, and agreement you will be blessed that you did.

DSLR : Improve Photographic Talents

Nowadays world is packed of technologies, which are supportive to users in various contexts. With rapid technological improvementment, many modern stylish devices have evolved, which are enriched with newest technologies. One of such modern and awfully evolve device is Digital SLR camera, which are compact cameras of high picture quality. Now people are more modern and want better quality camera which can offer them excellent pictures.

The DSLR camera is comes with more recovered and advance technology and offer the image of top-quality class. With these fabulous cameras one can capture exciting pictures without missing out any significant shot. These are well prepared with superb quality flash options to improve the image quality. There comes no problem of light factor with these amazing digital cameras as they are compact highly advance camera of newest techniques. This is the only camera which is able to click images of great quality even without any use of flash feature.
DSLR camera is best for those people who want to improve their photographic skills and love to capture images from different type of lenses. These efficient cameras are able to let users to present a accurately focused image with a blur background to get a dissimilar look of the photo. This incredible camera also let users with a super fast and effective shot to shot time in which a user can capture an great multi shots at a same time.

The ability to adjust lens to a telescoping lens means the user can zoom in on objects that are far away without bothering the subject by moving closer. This camera consists of different types of lenses which make easy to photographer to see tiny objects through macro lenses of high quality. The Digital SLR Cameras are stared best for people who want to do digital photography. However, its size is large than other cameras but they are simple handling devices with simple functioning. Their bulkiness has no bad effect on users and picture quality. The DSLR cameras are the best existing photography gear which can capture photos in the best way. These high qualities of DSLR camera have made them extremely popular and superior devices for better photography experience.

How to Get Better your Digital Slr Camera Pictures?

Digital SLR cameras are wonderful devices to spread out your creativity and to record special moments. If your starting out and strive to increase your work master, you need these five imperative tips. These tips deal with the affiliation of shutter speed and focal length, realizing proper focus, stability, handling backlighting, and the effects of ISO and noise.

Knowing how the focal length of your lenses conveys to the shutter speed you are capture with.

If your shooting with a 50mm lenses the directive of thumb is that you can hand hold your camera with shutter speeds of 1/50th of a second and higher. With a 200mm lenses that it’s 1/200th of a second. With classy image stabilization lenses you can hand hold a 200mmm at about 1/100th of a second maybe 1/60th of a second if you have steady hands. One trick I have used to constrict an extra shutter speed stop while hand holding my camera is holding my breath and keeping my arm tight close to my chest. Knowing your lenses and remembering this simple tip should yield sharper results in your photos while hand holding your digital SLR camera.

Knowing the focus system in your camera

Basically most digital SLR camera focuses when you press the shutter button halfway down. Generally you will listen to a beep and see a green or red sign throughout the viewfinder. This sign show what the camera is focusing on. Then press the button the rest of the way down to capture the image. Realize that the computer inside the camera is looking at divergences in image contrast and that divergence is what is focusing the camera. Most digital SLR cameras also let you adjust the focus point physically to wherever there is a encoded point in the viewfinder. At a minimum you will get 9 points of focus up to 45 points of focus. It depends on the type and brands of your digital SLR camera.

While completing my day-to-day shooting, I always start with my focus point in the center of the viewfinder then I move it according to the subject I am shooting. It is easy to forget about where you set your focus point and then wonder why your photos are off focus or out of focus. So when you start a shoot the first place to check is where your focus point is and then center it, this should help you get more shots in focus.

Stability and when to use a tripod

If you are trying with long exposures when shooting or if the shutter speed go over the focal length, then you need to use a tripod. All tripods are not the same. If in the studio a lightweight tripod can be used effectively if you weigh it down with sandbag or an alterative weighting device. When outdoors use a tripod on the heavier side is probably best, it also depending on weather condition. If there is a lot of wind you really need to secure the tripod with weight or some tripods even have a feature where you can spike them in the ground for more stability.

Any movement during a shot with a long exposure will approximately always leave that shot useless and that is why stability is so important. One of the newest advancements in camera technology is "image stabilization" in both lenses and camera bodies. This new machinery is great and its best used if shooting with two hands on the camera and bracing your body against something. Still in some shooting conditions there is still no replacement for a good weighted tripod.

How to handle strong backlighting

Backlighting subjects can be our adversary. Many people try to shoot a photo with a strong bright window light in the background, and then speculate why the shot didn't come out. Why does this happen? The bright light from the window floods the lens, and your camera usually can't recompense for it. One way to combat this is to use a fill flash on your subject or use a large white fill card. An alternative option is to diffuse the strong window light and fill the subject with a white fill card. Do not be scared of backlighting use it to your advantage, just remember you need to counteract a strong backlight with a strong fill.

Knowing the effects of ISO in Digital SLR Cameras

Digital SLR cameras have some of the same features as film SLR Cameras like interchangeable lenses, viewfinders, matrix metering, etc, but they do not handle ISO the same way. They are similar in that the relative ISO setting handles the light sensitivity that reaches the sensor or film. Where they differ is in the look they achieve in the final product. High ISO speeds on film have a certain film grain look to them that can be pleasing, but high ISO speeds on a digital SLR camera creates noise on the files and the look is not the same as film grain. In most situations noise is your enemy. If you want that film grain look, shoot your digital photos with the lowest possible ISO and then use Alien Skins Exposure® 2 plug in for Photoshop to achieve that film grain look.

In closing mastering these five tips will make your photography stronger, sharper, in focus and properly lit.

Get To Know Which Digital Slr Lense Is Right For You

After buy a digital slr,it is very important to know the function of very lenses.Usually people overlook on camera's lenses.Lens is very important to digital slr camera.Lens serve as the 'eye' of digital slr camera.There are many type of lenses with different functions.

Prime lenses:
Prime lenses are fixed focal length.Usually we get this lense when we buy digital slr camera.To zoom with this lense,you need to use your feet and to get farther or closer to the subject.The advantage of this lense is it will produce more sharper image and faster than zoom lenses.

Macro lenses:
We use this lense for extreme close up on small object like insects,flowers,food and many more.This lense is very good for selcetive types of focus.

Normal lenses:
Normal lense is a simple lense like digital camera lense.But.we can produce versatile picture also from this lense depends on our creativity.

Wide-angle lenses:
This lense have short focal length.The short focal length makes the subject far away from you and make it looks smaller. The best part using this lense is you can be relatively close to your subject and fit a broad stroke of the background into the scene.

Telephoto lense:
Telephoto lense is a lense with focal length 100mm and higher.The effect of this focal length is,it bring the subject closer to you.

Zoom lenses:
This is very special lense because it can be very versatile.This lense vary in their focal length and come in many fuctions like wide angle and many more.This lense is very expensive but not very expensive if we compare the price with the function of this lense.

Understand the use of every lense will help you produce very quality picture using your digital slr camera.

Tips To Buy A Digital Slr

Nowadays,there are many digital slr camera at the markets.The features that available on a digital slr are amazing but it is no use if you dont understand their technical details.Maybe sometimes we confuse which digital slr to buy.

Actually,the first thing you must do is understand about digital slr.For example you must know about Megapixel and the function to you.Megapixel stands to resolution of the camera.The higher megapixel will produce more higher and clearer picture.

But,you must take note that sometimes higher megapixel also cause your picture looks unnatural.Besides that,you must compare the price to the megapixel.

After that,take some times to read the reviews about digital slr camera.It is very important before you choose which model you want to purchase.

After you have understands about the good and bad,and also which digital slr that fullfill the crateria that you need,you can make your step to the digital slr shops around you to buy it.

Hope this tips will guide you to choose the best digital slr camera for you.

Basic Photoshop Tutorial For Newbie

Hye everyone..

Have you choose what model do you want to buy?
I already post 3 brands that is 'GIANT' in Digital Slr world.Maybe after this i will post review for Olympus camera.

Now i will like to give a Adobe Photoshop tutorial.Adobe Photoshop is a software that we can use to edit our picture.If you master in this software,you can produce a good quality picture even the pictures that you capture is not very good.

Here is the tutorial.


This is the workspace in Adobe Photoshop.


And this is the menu bar.By using this menu bar,you can open new file,change the file size,add filter,edit colour and many more.


FILE :

  • open new file
  • load image from pc
  • save image
  • print image
EDIT :
  • for copy and paste
  • fill colour to image
  • rotate image
IMAGE
  • change image size
  • change canvas size
  • change image mode (rgb,cmyk,grayscale)
  • add space to image
LAYER :
  • add style to layer/image
  • add layer
  • delete layer
SELECT
  • select specific position from image
FILTER
  • apply filter to image
  • to add special effect
VIEW
  • to change image screen


This is the Tool Option Bar

It will change refer to the tools that you select.You must remember that different tool show different option bar.


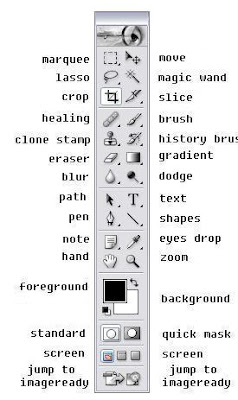
This is the Toolbox
We use this tool to edit image.
And this is the Shortcut Key Tool Box
We use this as a shortcut.So,you dont have to click to the Tool Box.

Sometimes we a small cursor at certain tools.It means that that tool have more than 1 tool inside there.If you want to see the tools that hiding inside that,just right click to that tool and you can see all the tools that hiding inside.

This is the funtion for every tools :

Marquee Tool:

Rectengular Marquee Tool
  • to make a square selected field
Elliptical Marquee Tool
  • to make a round selected field
LASSO TOOL

Lasso tool
  • to select a field which is not straight line
Polygonal lasso tool
  • to select a field which is a straight line
Magnetic lasso tool
  • to select a field refer to the shape
Magic Wand Tool
to build a field which have same colour range

Crop Tool
to cut certain part in image

Slice Tool
to seperate large image into parts

BRUSH TOOL

Brush tool
  • to draw or colour image
Pencil Tool
  • to write and make a sketch
HEALING BRUSH TOOL

Healing Brush Tool
  • to recover certain field at image using pixel from other image
Patch Tool
  • to recover certain field at image using pixel from other image
CLONE STAMP TOOL

Clone Stamp Tool
  • to paste or copy certain field from image to other place
Pattern Stamp Tool
  • to paste some pattern to image
ERASER TOOL

Eraser Tool
  • to erase certain part in image
Background Eraser Tool
  • to erase image background
BLUR TOOL

Blur Tool
  • to blur certain part in image
Sharpen Tool
  • to sharp certain part in image
Hope this tutorial will guide you to use Adobe Photoshop

sony a700


PRODUCT : SONY A700

PRICE : RM 5500

SPECS :

Camera Type :
Digital SLR camera with built-in flash and interchangeable lenses
Sensor :
APS Exmor™ Sensor, 23.5 x 15.6 mm (APS-C size) with RGB primary color filter
No. of Pixels :
Total: 13.05 megapixels; Effective: 12.24 megapixels
Dust Reduction :
Charge protection coating on low pass filter and image-sensor shift mechanism
File Format :
JPEG, RAW, RAW+JPEG (DCF 2.0 compliant, DPOF 1.1 print functions supported, Exif 2.21 supported)
Settings :
Automatic, Preset (Daylight, Shade, Cloudy, Tungsten light, Fluorescent light, Flash), Colour Temperature (2500 - 9900k with 19-step Magenta / Green compensation) / Colour Filter, custom
LCD Monitor :
3.0-inch (100% field of view), 921,600-dot TFT, hybrid type (Xtra Fine LCD)
Focus Modes :
Auto-focus / manual focus selectable (auto-focus modes: AF automatic selection, one-shot AF, continuous AF, direct manual focus)
Exposure Modes :
Program AE (Auto mode / P-Mode, with program shift), aperture-priority AE (A-Mode), shutter-priority AE (S-Mode), manual (M-Mode)
Scene Selector :
Portrait, Landscape, Macro, Sports, Sunset, Night view / Night portrait
Metering Type :
Direct TTL metering (40-segment honeycomb-pattern metering, center-weighted metering, spot metering)
Flash Metering and Control :
ADI / Pre- flash TTL flash metering, manually activated
Shutter Speed Range :
1/8000 sec. - 30 sec., bulb
Viewfinder Type :
Fixed eye-level system with optical glass type pentaprism
PC Interface :
USB2.0 Hi-Speed (mass storage mode / PTP mode)
Dimensions (W x H x D) :
Approx. 141.7 x 104.8 x 79.7mm (excl. protrusions)
Weight :
Approx. 690g (not including battery, memory card or accessories)
Operating Temperature Range :
0° - 40° C

REVIEW :

Sony is a famous name in the field of electronics customer.It is generally highly praises for its digital cameras and other electronic items.

Along with this wonderful merchandise,Sony is also coming up with latest updates of Image Data Lightbox bundled software applications ang Image Data Converter.The updated firmware would surely raise the perfomance capability of the camera. This update,on the other hand,would raise the entensity of images and decrease the amount of sound in certain circumstances. An interesting feature of the update is that it can manage flashes with non-ADI controls even at short distances.

Sony is quite posite about the recent updates of the firmware for its DSLR-A700 camera.As said by official source,"improved image sharpness and noise" is what is predictable from the newly revealed firmware updates.It is also revealedthat the update release include patches to Sony's RAW file converter.In most of the countries,Sony has already started giving online help to their customers for downloading the firmware updates.Anyway the results are yet to come,wether the new updates will actually help to get better photography or not is still uncertain.


SONY A300


PRODUCT : Sony A300

PRICE : RM 2500

SPECS :

CAMERA TYPE:
Digital SLR camera with built-in flash and interchangeable lenses


No. of Pixels :
Total: 10.8 megapixels; Effective: 10.2 megapixels
Dust Reduction :
Charge protection coating on low pass filter and image-sensor shift mechanism
Sensitivity :
Auto, ISO 100 to 3200 (in 1-stop increments, Recommended Exposure Index)
File Format :
JPEG (DCF2.0, Exif 2.21), RAW (Sony ARW 2.0 format), RAW + JPEG
Settings :
Automatic, Preset (Daylight, Shade, Cloudy, Tungsten light, Fluorescent light, Flash), Colour Temperature (2500 - 9900k with 19-step Magenta / Green compensation), custom
LCD Monitor :
2.7-inch (100% field of view), 230,400-dot TFT, Clear Photo LCD
Focus Modes :
Auto-focus / Manual focus selectable (Auto-focus modes: Single-shot AF, Automatic AF, Continuous AF)
Exposure Modes :
Program AE (Auto mode, Auto mode with Flash Off, P-Mode with program shift), aperture-priority AE (A-Mode), shutter-priority AE (S-Mode), manual (M-Mode)
Scene Selector :
Portrait, Landscape, Macro, Sports, Sunset, Night view / Night portrait
Shutter Speed Range :
1/4000 sec. -30 sec., bulb
PC Interface :
USB2.0 Hi-Speed (mass storage mode / PTP mode)
Dimensions (W x H x D) :
Approx. 130.8 x 98.5 x 74.7mm (excl. protrusions)
Weight :
Approx. 582g (not including battery, memory card or accessories)
Operating Temperature :
Range
0° - 40° C

REVIEW :

The Sony Alpha DSLR-A300 Digital SLR Camera attribute a 10.2 mega pixel CCD sensor, Live View, a sports built-in sensor shift anti-shake facility which works with practically any lens and a vertically-tilting monitor. The included kit comes with Sony's DT 18-70 mm lens.

The sensor that affords the Live View abilities is the secondary sensor that comes built into the viewfinder. The A300 offers a flexible, real-time Live View LCD that improve the evolution from point-and-shoot to digital SLR. This camera features an edge over it's rival challenger in that it's flexible Live View works in real time.

The A300 arrives with a 2.7 inch Live View screen which offers high-quality real time viewing, so you can control images using the LCD screen just as you would with a point and shoot camera. An easy mechanical switch allows you to fastening back and forth between features. The Live View mode does not slow down the camera's mechanics because the Alpha DSLR-A300's Live View uses a separate mirror to transmit images. The customary viewfinder also works just fine, as the eyecup and diopter comfortably fits most persons

The Live View mode let you to create shots of subjects at ground level easily, since you don't have to bend down onto the ground to look through the viewfinder. The LCD's quality is outstanding and the Live View is truly an inventive feature of this camera that has many advanced functions and features. The A300 weighs 16.3 ounces. Not quite so light, the camera still gives a solid and balanced feel.

Manual setting are easy to manage, as the aperture and shutter priority modes are easy to switch. The A300's Exposure Shift setting allow you set what you perceive as proper exposure and then allows you to make equivalent exposures using special shutter speeds and apertures. The white-balance settings are easy to adjust and fully customizable via the interactive menu.

What makes the Sony Alpha DSLR-A300 Digital SLR Camera so attractive by far is it's smooth Live View handling. Not only that, but this camera is very fun to use and simple.

sony alpha 200


PRODUCT: SONY ALPHA 200
PRICE :
RM2100

SPECS :
Camera Type:
Digital SLR camera with built-in flash and interchangeable lenses
Image Capture Sensor:
23.6 x 15.8mm (APS-C type) with primary colour filter
No. of Pixels
Total:
10.8 megapixels; Effective: 10.2 megapixels
ISO :
100 to 3200 (in 1-stop increments, Recommended Exposure Index)
File Format:
JPEG (DCF2.0, Exif 2.21), RAW (Sony ARW 2.0 format), RAW + JPEG
Noise Reduction:
Long Exposure:
Available at shutter speeds longer than 1 sec. High ISO: available at the ISO set to 1600 or above
White Balance Settings :
Automatic, Preset (Daylight, Shade, Cloudy, Tungsten light, Fluorescent light, Flash), Colour Temperature (2500 - 9900k with 19-step Magenta / Green compensation), custom
Display :
LCD Monitor
2.7-inch (100% field of view), 230,400-dot TFT, hybrid type (Clear Photo LC )

Focus Modes:
Auto-focus / manual focus selectable (auto-focus modes: AF automatic selection, one-shot AF, continuous AF)
Exposure Modes:
Program AE (Auto mode / P-Mode, with program shift), aperture-priority AE (A-Mode), shutter-priority AE (S-Mode), manual (M-Mode)
Scene Selector :
Portrait, Landscape, Macro, Sports, Sunset, Night view / Night portrait
Metering Type :
TTL metering (Multi Segment, Center-Weighted, Spot)
Metering Sensor:
40-segment honeycomb-pattern SPC
Metering Range:
1EV - 20EV (+3EV to +20EV with spot metering), ISO 100 equivalent with F1.4 lens
Exposure Compensation:
+/- 2EV (1/3 EV increments)
AE Lock :
Yes
Built-In Flash Type :
Built-in Auto Pop-up
Shutter Type:
Electronically-controlled, vertical-traverse, focal-plane shutter
Speed Range:
1/4000 sec. -30 sec., bulb
Flash Sync Speed:
1/160 sec
Viewfinder Type:
Fixed eye-level, penta-Dach-mirror
Shooting :
Exposure Bracketing
3 continuous or single exposures selectable, in 0.3 or 0.7-stop increment

Size :
Dimensions (W x H x D)
Approx. 130.8 x 98.5 x 71.3mm (excl. protrusions)

Weight:
Approx. 552g (not including battery, memory card or accessories)
Operating Temperature :
Range
0° - 40° C

REVIEWS :

It looks like in this day and age, we see the reveal of a new digital camera that is designed to please digital photography devotee -- newbie and expert -- all over the world. Earlier this year, Sony revealed its latest Alpha digital SLR, A200. The company published the Sony Alpha 200 as an entry-level model but with serious objectives. The digital camera is developed a tool for those photographers that like to take their shooting skills to a higher level and grow to a higher segment.

Like many mass marketed digital cameras from company as big as Sony, they advertise upon the high resolution that is offered and how high the image condition produced. The Sony Alpha 200 has the set up 10 megapixel Sony CCD but come into the Alpha 700 image parameters and noise reduction through BIONZ image processing. Sony A200 autofocus improvement is on the list of changes from the Alpha 100 that it replaces. Aside from its high image quality, the A200 also offer some great options to improve photography skill.

The DSLR-A200 is a valuable challenger in the entry-level market, offering amazing picture quality, strong performance, great ergonomics and loads of useful exposure options. One feature that stands out is the Super SteadyShot option. This option is designed reduce blurry picture taken from shaky hands, thus reduce the worries for those digital photography enthusiasts with unsteady hands.

As you can probably tell by now, even these are just SOME features that Sony A200 has to offer. In spite of the high pixel and steady shooting feature it has, do keep in mind that the Sony Alpha 200 (A200) is an entry level digital SLR and shall not be compared with mid-range digital SLR such as Olympus E3, Canon 40D or Nikon D300.


Sony A100

PRODUCT : SONY A100
PRICE :
RM 16OO
PRODUCT DESCRIPTION :

This camera built with 10.2 Mega Pixels, Super SteadyShot built into the camera body to fight againts picture blur, and an highly developed anti-dust protection system for the CCD this camera is the termination of the most advanced digital machinery and accuracy optics.


SPECS:


Camera Type :
Digital SLR camera with built-in flash and compatible lenses

Image Capture Sensor :
23.6 x 15.8mm (APS-C size) link scan CCD with primary colour filter

No. of Pixels :
10.8 megapixels; Effective: 10.2 megapixels

Aspect Ratio :
3:2

Dust Lessening :
Static-resistant anti-dust coating (incorporated in CCD-Shift mechanism)

Sensitivity :
Auto, ISO 100, 200, 400, 800, 1600 equivalent

Recording Media :
Memory Stick Duo, Memory Stick PRO Duo (includes Memory Stick Duo adaptor for CompactFlash slot), Compact Flash (Type I & II), Microdrive

Format Function :
FAT 12, 16, 32

A/D Conversion :
12 bit

File Format :
JPEG, RAW, RAW+JPEG (DCF 2.0 compliant, DPOF 1.1 print functions supported, Exif 2.21 supported)

Indicator inside viewfinder Compensation :
Approx. 2EV - 3.5EV decrease in shutter speed (varies according to conditions and lens used)

Display :
LCD Monitor 2.5-inch (100% field of view), 230,400-dot TFT, hybrid type (Clear Photo LCD Plus)

Focus Modes :
Auto-focus / manual focus selectable (auto-focus modes: AF automatic selection, one-shot AF, continuous AF, direct manual focus)

Exposure Modes :
Program AE (Auto mode / P-Mode, with program shift), aperture-priority AE (A-Mode), shutter-priority AE (S-Mode), manual (M-Mode)

Scene Selector :
Portrait, Landscape, Macro, Sports, Sunset, Night view / Night portrait

Metering Type :
Direct TTL metering (40-segment honeycomb-pattern metering, center-weighted metering, spot metering)

AE Lock :
Automatically activated with AF lock, available with AE lock button

Built-In Flash :
Flash Metering and Control ADI/ Pre- flash TTL flash metering, manually activated

Shutter Type :
Electronically-controlled, vertical-traverse, focal-plane shutter

Speed Range :
1/4000 sec. -30 sec., bulb

Flash Sync Speed:
1/160 sec. (1/125 sec. with Super SteadyShot on)

External Power Source :
AC adaptor - AV-VQ900AM (optional)

Battery Performance :
Approx. 750 frames recorded (CIPA measurement)

Connectivity PC Interface :
USB2.0 Hi-Speed (mass storage mode / PTP mode)

Compatible OS

Microsoft Windows Me / 2000 Professional / XP Home Edition / XP Professional, Macintosh Mac OS X (v.10.1.3 and later)

Size :
Dimensions (W x H x D) Approx. 133.1 x 94.7 x 71.3mm (5.2" x 3.7" x 2.8")

Weight Approx.:
545g (not including battery or accessories)

Operating Temperature Range:
0° - 40° C


Review:

This is the 1st model dslr camera from Sony.This stuff is quite good for a beginner.With all the specs,you can capture high quality pictures depends on your creativity.But only one thing that make professional photographer don’t choose this camera..it is because the body is plastic…

Canon EOS 450D


PRODUCT : Canon EOS 450D
PRICE :
RM 3349
PRODUCT DESCRIPTION :
The EOS 400D was a very good camera and the Eos 450D clearly improves on it in a number of areas.At the same time,the technology,user's expectation and Canon's ricals have moved on too.

PRODUCT SPECS:

SENSOR :
12.2 MP, 22.2 x 14.8 mm
SLR FOCAL LENGTH :
1.6x
SLR LENSE MOUNT :
Canon EF/EF-S
MEMORY :
SD (non supplied)
ISO RANGE :
100-1600
EXPOSURE MODES :
Auto,A,P,S,M,Portrait,Landscape,Close Up
METERING MODES :
Evaluate,Centre-weight,Partial,Spot
FOCUSING MODES :
9 point AF,one shot,AI focus,AI servo,auto/manual focus
SHUTTER DELAY :
0.25sec
SHUTTER SPEED :
30s-1/4000sec
INTEGRAL FLASH :
GN 13 at ISO 100
FLASH SYNC :
1/200 sec
FLASH MODES :
on,off,auto,red eye,slow sync,rear curtain sync
DRIVE MODES :
single,continuous,self-timer
WRITE TIMES :
JPEG/RAW 1/1.5 sec
LCD MONITOR :
3 inch colour lcd, 230 000 dots
WEIGHT :
475g without battery and card
POWER SUPPLY :
Li-on
BATTERY LIFE :
500 shots
TRANSFER :
usb 2.0 High speed,video
SOFTWARE :
includes ZoomBrowser EX


REVIEWS :

FEATURES:
the live view mode, stabilised kit lens, 3.5 fps shooting, 12 MP sensor and 3 inch LCD are all good.

PERFOMANCE:
the live view works well,but the lense quality is excellent and the contrast/colour can be better

HANDLING:
on body buttons offer quick access to adjustments that many cameras leave burried in the menus.

BUILD QUALITY:
its plastics but the 450d is well put together and its controls have an excellent feel

VALUE FOR MONEY:
the 450d in a slightly uneasy position between cheaper models and better,pro cameras.

Canon EOS 400D


PRODUCT: Canon EOS 400D
PRICE: RM 2299
PRODUCT DESCRIPTION: This camera follows the design of the EOS 350D, being very compact and relatively lightweight but not compromising on manual controls or in-use performance. The headline changes are another two megapixel step up (to ten megapixels), the nine-point AF sensor from the EOS 30D, a new dust removal system which includes anti-static surface coatings, low-pass filter vibration and software based dust pattern removal. Less important but just as noticeable are the removal of the status LCD, replaced instead by a camera settings screen on the now larger 2.5" LCD monitor and the eye proximity sensor just below the viewfinder to turn this off when composing your shot.

PRODUCT SPECS:

Type
Digital, single-lens reflex, AF/AE camera with built-in flash
Recording media
Type I or II CF card
Image sensor size
22.2 x 14.8mm
Compatible lenses

Canon EF lenses (including EF-S lenses) (35mm-equivalent focal length is approx.1.6 times the lens focal length)
Lens mount
Canon EF mount
Imaging Element
Type
High-sensitivity, high-resolution, large single-plate CMOS sensor
Pixels
Effective pixels: Approx. 10.10 megapixels
Total pixels: Approx. 10.50 megapixels
Aspect ratio
3:2
Color filter system

RGB primary color filter
Color filter Type
Low-pass filter: Located in front of the image sensor, non-removable
Dust deletion feature
(1) Sensor cleaning: Auto
(2) Sensor cleaning: Manual
(3) Dust delete data appended to image data
Recording System

Recording format
Design rule for Camera File System 2.0 & EXIF 2.21
Image type
JPEG Type, RAW Type
RAW+JPEG Type simultaneous recording
Provided
File size
(1) Large/Fine: Approx. 3.8MB (3888 x 2592 pixels)
(2) Large/Normal: Approx. 2.0MB (3888 x 2592 pixels)
(3) Medium/Fine: Approx. 2.3MB (2816 x 1880 pixels)
(4) Medium/Normal: Approx. 1.2MB (2816 x 1880 pixels)
(5) Small/Fine: Approx. 1.3MB (1936 x 1288 pixels)
(6) Small/Normal: Approx. 0.7MB (1936 x 1288 pixels)
(7) RAW Type: Approx. 9.8MB (3888 x 2592 pixels)

*Exact file sizes depend on the subject, ISO speed, Picture Style, etc.
File numbering
Consecutive numbering, auto reset, manual reset
Color space
sRGB, Adobe RGB
Picture Style
Standard, Portrait, Landscape, Neutral, Faithful, Monochrome, User Def. 1 - 3
Interface
USB port (USB 2.0 Hi-Speed): For connection to a personal computer and direct printing Video OUT terminal (NTSC/PAL)
White Balance

Type
Auto, daylight, shade, cloudy, tungsten, white fluorescent light, flash, custom
Auto white balance
Auto white balance with the image sensor
Color temperature compensation
White balance correction: ±9 stops in full-stop increments
White balance bracketing: ±3 stops in full-stop increments

* Blue/amber bias or magenta/green bias possible
Color temperature information transmission
Provided
Viewfinder

Type
Eye-level pentamirror
Coverage
Vertical/Horizontal approx. 95%
Magnification
Approx. 0.8x (-1 diopter with 50mm lens at infinity)
Eyepoint
Approx. 21 mm
Built-in dioptric adjustment
-3.0 - +1.0 diopter
Focusing Screen
Fixed, precision matte
Mirror
Quick-return half mirror (Transmission: reflection ratio of 40:60, no mirror cut-off with EF600mm f/4L IS USM or shorter lenses)
Viewfinder information
AF information (AF points, focus confirmation light), exposure information (shutter speed, aperture, AE lock, exposure level, exposure warning), flash information (flash ready, high-speed sync, FE lock, flash exposure compensation), white balance correction, maximum burst, CF card information
Depth-of-field Preview
Enabled with depth-of-field preview button
Autofocus


Type
TTL secondary image-registration, phase detection
AF Points
9 AF points
Metering range
EV -0.5 - 18 (at 23°C/73°F, ISO 100)
Focus modes
One-Shot AF, AI Servo AF, AI Focus AF, Manual focusing (MF)
AF Point Selection
Auto, manual
Selected AF point display
Superimposed in viewfinder and indicated on LCD monitor
AF-assist beam
Small series of flashes fired by built-in flash
Effective range
Approx. 4.0m/13.1ft. at center, approx. 3.5m/11.5ft. at periphery
Exposure Control

Metering Modes
35-zone TTL full aperture metering
• Evaluative metering (linkable to any AF point)
• Partial metering (approx. 9% of viewfinder at center)
• Center-weighted average metering
Metering Range
EV 1 - 20 (at 23°C/73°F with EF50mm f/1.4 USM lens, ISO 100)
Exposure control
Program AE (Full Auto, Portrait, Landscape, Close-up, Sports, Night Portrait, Flash Off, Program), shutter-priority AE, aperture-priority AE, depth-of-field AE, manual exposure, E-TTL II autoflash
ISO speed
Basic Zone modes: ISO 100 - 400 set automatically
Creative Zone modes
Equivalent to ISO 100 - 1600 (in 1-stop increments)
Exposure compensation
Manual: ±2 stops in 1/3- or 1/2-stop increments (can be combined with AEB)
AEB
±2 stops in 1/3- or 1/2-stop increments
AE lock
Auto: Applied in One-Shot AF mode with evaluative metering when focus is achieved
Manual: By AE lock button in all metering modes
Shutter


Type
Electronically-controlled, focal-plane shutter
Shutter Speeds
1/4000 to 30 sec. (1/3- and 1/2-stop increments), bulb, X-sync at 1/200 sec.
Shutter release
Soft-touch electromagnetic release
Self-timer
10-sec. delay
Remote control
Remote Switch RS-60E3
Remote Controller RC-5/RC-1
Built-in Flash


Type
Retractable, auto pop-up flash
Flash metering
E-TTL II autoflash
Guide No.
13/43 (ISO 100, in meters/feet)
Recycle time
Approx. 3 sec.
Flash-ready indicator
Flash-ready icon lights in viewfinder
Flash coverage
17mm lens angle of view
Fe Lock
Provided
Flash exposure compensation
±2 stops in 1/3- or 1/2-stop increments
External Speedlite


EOS-dedicated Speedlite
E-TTL II autoflash with EX-series Speedlite
Zooming to match lens focal length
Provided
Drive System


Drive modes
Single, continuous, and self-timer
Continuous
Max. 3 shots per sec.
Maximum burst
JPEG Type (Large/Fine): Approx. 27, RAW Type : Approx. 10, RAW+JPEG Type (Large/Fine): Approx. 8

*Based on Canon’s testing conditions with a 512MB CF card
* Varies depending on the subject, ISO speed, Picture Style, etc.
LCD Monitor


Type
TFT color liquid-crystal monitor
Monitor size
2.5 in.
Pixels: Approx
230,000
Coverage
Approx. 100%
Brightness adjustment
7 levels provided
Interface languages
15
Image Playback


Display format
Single image, shooting information, 9-image index, magnified view (approx. 1.5x - 10x), autoplay, image rotation, and jump (by 10 or 100 images, by date)
Highlight warning
In the shooting information mode, any overexposed highlight areas with no image information will blink
Histogram: Brightness, RGB
Image Protection and Erase
Protect
Single images can be erase-protected or not.
Erase
One image or all images in the CF card can be erased (except protected images)
Direct Printing


Compatible printers
PictBridge, CP Direct, and Bubble Jet Direct-compatible printers
Printable images
JPEG Type images (DPOF printing possible)
Easy Print feature
Provided
DPOF: Digital Print Order Format
DPOF
Version 1.1 compatible
Direct Image Transfer
Compatible images
JPEG Type and RAW Type images

* Images to be used for wallpaper on the personal computer screen must be JPEG Type images
Customization


Custom Functions
11 Custom Functions with 29 settings
Power Source


Battery
Battery Pack NB-2LH, quantity 1

* AC power enabled with AC Adapter ACK-DC20
* With Battery Grip BG-E3, size-AA batteries can be used
Battery life
[Number of shots • approx.]
Temperature
Shooting Conditions
No Flash
50% Flash Use
At 23°C / 73°F
500
360
At 0°C / 32°F
370
280

* The above figures apply when a fully-charged Battery Pack NB-2LH is used
* The figures above are based on CIPA (Camera & Imaging Products Association) testing standards
Battery check
Auto
Power saving
Provided
Power turns off after 30 sec., 1, 2, 4, 8, or 15 min.
Date/Time battery
One CR2016 lithium battery
Startup time
Approx. 0.2 sec.
Dimensions and Weight
Dimensions (W x H x D)
126.5 x 94.2 x 65 mm
Weight
Approx. 510 g (body only)
Operation Environment
Working temperature range
0°C - 40°C / 32°F - 104°F
Working humidity
85% or less


REVIEWS:
SUPERB IMAGING PERFOMANCE:
  1. 10.1 MP for high resolution and superb quality and detail
  2. noise reducition at high iso setting
  3. ultra fast processing speeds
INTEGRATED CLEANING SYSTEM:
  1. the cleaning system minimize effects of dust
  2. including self cleaning function and dust delete function
High Speed & Quick Response:
  1. continuous shooting speed=3fps
  2. maximum shutter speed up to 1/4000sec
  3. 0.2 sec start up time
Picture Style:
  1. Just like selecting the film type for a conventional camera, users can get the optimum image by selecting the correct setting
  2. More Picture Style files can be downloaded from Canon website- Twilight, Clear, Autumn, Nostalgia and Emerald
CONCLUSION : GOOD TO BUY :)


selangor2u.com